Introduction
This is the user guide for the VCAnx video analytics plug-in for the Nx Witness server.
This guide will describe the features and options within the VCAnx plug-in.
Architecture
VCAnx plug-in
The VCAnx plug-in consists of two components.
- VCAnx plug-in: The VCAnx plug-in is installed alongside the Nx Witness server and provides the link to the VCAnx servers.
- VCAnx Server: The VCAnx server component receives the encoded video from Nx Witness, decodes and processes the video through the analytics engines and rules. It will then feedback the metadata to the VCAnx plug-in to be integrated into the video stream in Nx Witness.
Note: The VCAnx server component can be installed on the same hardware platform as Nx Witness, but due to the resource requirements this can result in high resource usage and reduced channel capacity.
The VCAnx configuration tool is a stand alone application, designed to provide a feature rich experience when configuring a channels video analytic features.
Prerequisites
For the purposes of this document, it is assumed that the VCAnx server component will be installed on a dedicated hardware platform.
Hardware
The hardware specifications for a given system will depend on the intended number of video channels to be processed, as well as which trackers and algorithms will be run on those channels. Some initial guidelines are provided below:
x86
- CPU: Suitable Server grade CPU
- Memory: 16GB or higher
- Storage: 512GB for OS and application
- Network: 1 gigabit or higher
- GPU: NVIDIA GPU with CUDA Compute Capability of
7.5 or higher
NVIDIA Jetson
VCAnx also support GPU acceleration on the NVIDIA Jetson Orin range of embedded devices. For optimal performance JetPack 5.0.1 should be installed.
In the absence of a correctly configured or installed GPU, VCAserver will either default to running the deep learning features on the CPU or, algorithms with a strict GPU requirement, will not be available.
Software
As the combinations of operating system, drivers and hardware is so variable, software requirements are based on configurations used internally for testing.
- Ubuntu 18.04 LTS Desktop / Server (or higher) or Windows 10 / Server 2016 (or higher)
- NVIDIA graphics drivers
v516.94
- NVIDIA CUDA Toolkit
v11.7.1
Environment
To ensure a host system is ready to run VCAnx, it is advised the following checks are made to ensuring the host system is ready to run the analytics.
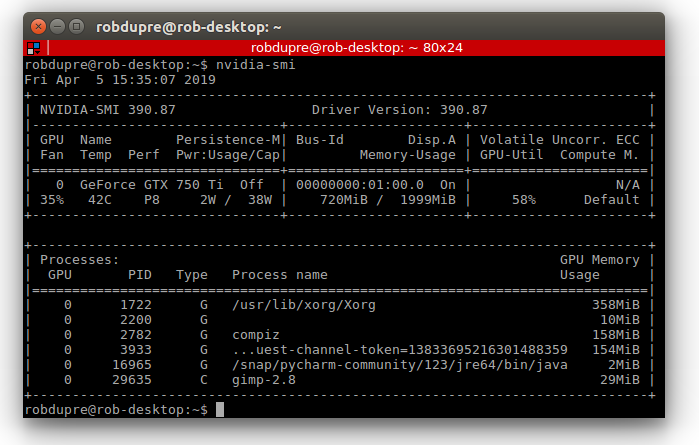
- Check the NVIDIA graphics card is detected by the driver using the NVIDIA tool
nvidia-smi. At the command prompt, type nvidia-smi.
- Check the NVIDIA CUDA Toolkit is installed and configured in the OS environment using the NVIDIA tool
nvcc. At the command prompt, type nvcc -V.
Installing VCAnx
The latest version of the VCAnx plug-in for Nx Witness can be downloaded through the support portal on the VCA technology website or obtained from your local software distributor.
Windows
Copy the installation files to the target system and install the VCAnx plug-in.
vcanx_installer_**VERSION_NUMBER**
- VCAnx Server: The VCAnx server component receives the encoded video from Nx Witness, decodes and processes the video through the analytics engines and rules. It will then feedback the metadata to the VCAnx plug-in to be integrated into the video stream in Nx Witness.
- VCAnx Server Plug-in: The VCAnx plug-in is installed alongside the Nx Witness server and provides the link to the VCAnx servers.
Where the same hardware is being used for Nx and VCAnx, select both options to install.
Linux
VCAnx server and VCAnx Plug-in on Linux comes as a single archive file containing an .sh script, which handles the installation of the components. Once the archive has been downloaded, navigate to folder and unpack the installation script from the archive.
./vcanx-installer-**VERSION_NUMBER**-linux64-vca_core-**VERSION_NUMBER**.sh
The .sh script consists of 3 different install options.
- Server only: The VCAnx server component receives the encoded video from Nx Witness, decodes and processes the video through the analytics engines and rules. It will then feedback the metadata to the VCAnx plug-in to be integrated into the video stream in Nx Witness.
--server-only
sudo ./vcanx-installer-**VERSION_NUMBER**-linux64-vca_core-**VERSION_NUMBER**.sh --server-only
- Plug-in only: The VCAnx plug-in is installed alongside the Nx Witness server and provides the link to the VCAnx servers.
--plugin-only
sudo ./vcanx-installer-**VERSION_NUMBER**-linux64-vca_core-**VERSION_NUMBER**.sh --plugin-only
- Both: This option will install both the VCA analytics engine and the plug-in for the Nx Witness server.
--both
sudo ./vcanx-installer-**VERSION_NUMBER**-linux64-vca_core-**VERSION_NUMBER**.sh --both
Where the same hardware is being used for Nx and VCAnx, select both options to install.
Although the VCA analytics can be configured through the Nx Witness Client, some of the features cannot be fully realised due to integration limitations. To resolve this there is a separate tool available that can be used to provide a complete experience and aid in the configuration process.
Linux
The VCAnx configuration tool is provided as a snap package and can be installed through the following command.
sudo snap install ./vcanx_vca-config_**VERSION_NUMBER**_amd64.snap --dangerous
Windows
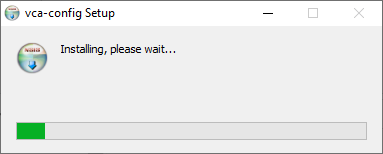
The VCAnx configuration tool is provided as an EXE installer and can be installed by copying to the target system and opening the file.
vcanx-config-setup **VERSION_NUMBER**-x64
Logging in
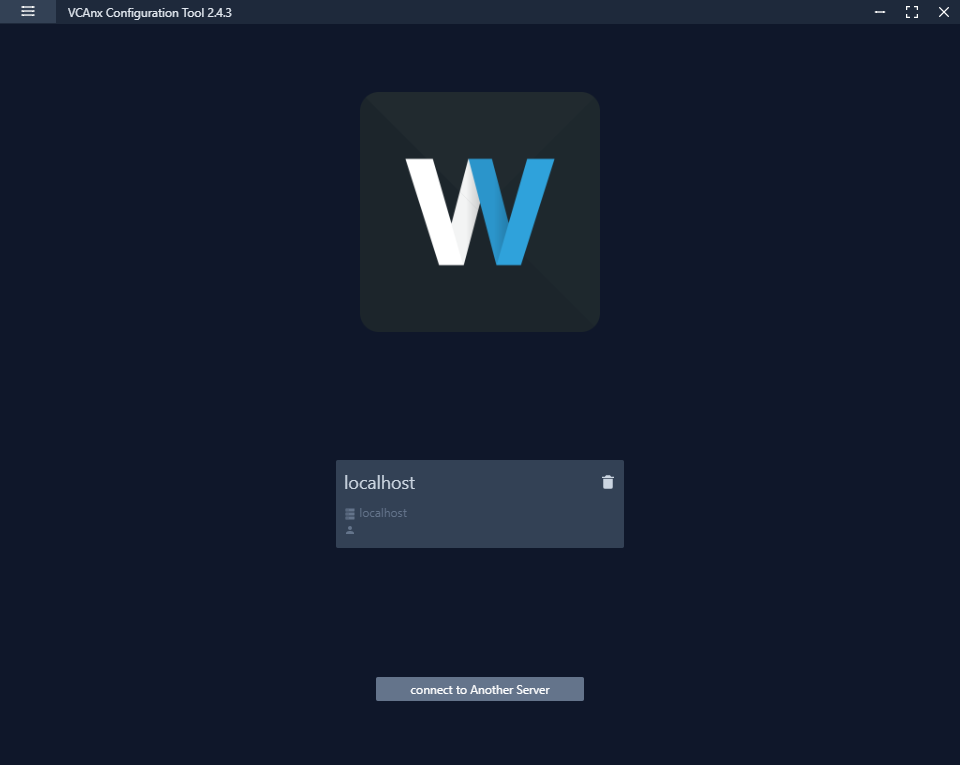
Once installed you can access the tool from the applications on the desktop. The configuration tool displays a similar interface to the Nx Witness Client, connect to the Nx Witness server you want to configure and login.
Once you are logged into the Nx Witness server, there is a list of the cameras on the left side bar. This list shows all the cameras that have had the VCAnx plug-in enabled, the plug-in can be enabled or disabled through the Nx Witness Client.
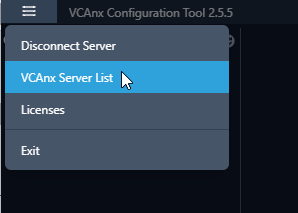
- Menu: Displays the menu options.
- Disconnect Server: Disconnects the current session with your Nx server.
- VCAnx Server List: Displays a list of the VCAnx server(s) your Nx system is configured to use.
- Licenses: Displays a list of the licenses available from the VCAnx servers.
- Search: This can be used to filter the camera list based on the name.
- VCA: The VCA button toggles the camera list between showing all cameras on the Nx system or just the cameras that have the plug-in enabled.
- Refresh: Refreshes the list of cameras from Nx.
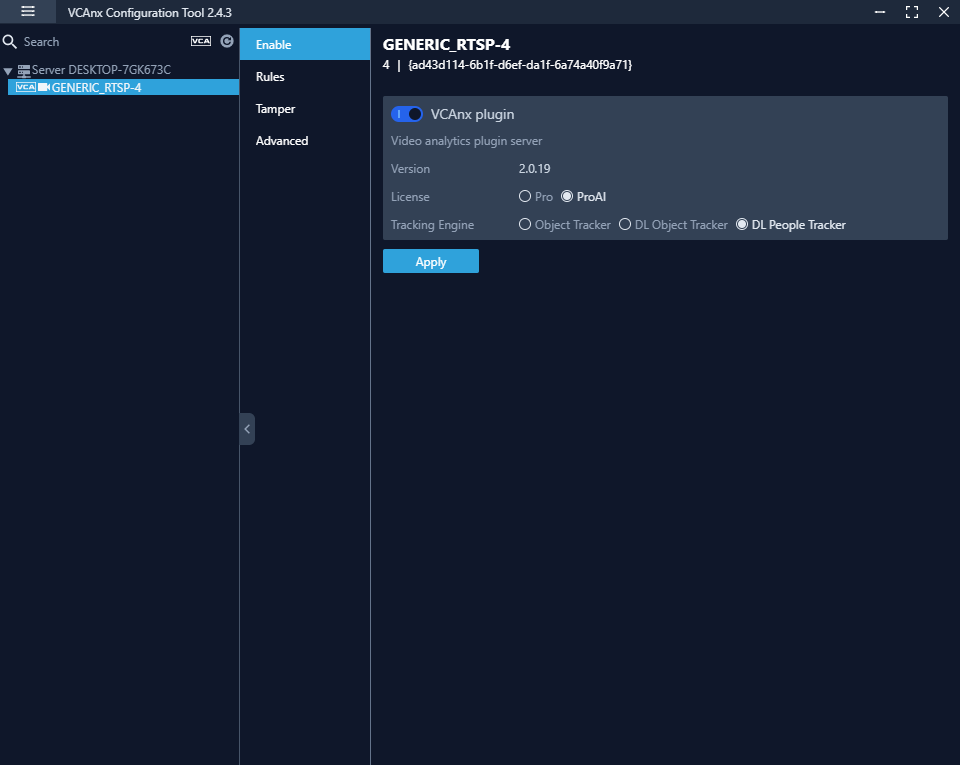
Enable
This option shows the status of the plug-in against the selected camera. From here you are change the license type and deep learning features.
- VCAnx plug-in: Toggle to enable/disable the plug-in for the selected camera.
- Version: Shows the current version of VCAnx being used.
- License: Select the license type that will be used against the camera, this will control which features are available.
- Tracking Engine: Defines the tracking engine that will be used for analytics.
- Object Tracker: When selected the tracker will need to 'learn the scene' to determine background from moving foreground objects. Whilst learning the scene the following message will be displayed in the live view, and no objects will be tracked during this time.
- Deep Learning Filter: Defines the Deep Learning filter settings for the camera. - Not use: Disable the Deep Learning filter for the selected camera. - Use: Use the Deep learning filter for classification.
- DL Object Tracker: When selected the tracker uses the GPU to detect and track objects in a scene.
- DL People Tracker: When selected the tracker uses the GPU to detect and track people in a scene.
Note: The calibration and classification features are not displayed when using the Deep Learning filter, DL Object Tracker or DL People Tracker. To show the available options, Select the tracker and click Apply.
Note: When first selected, the DL trackers will run a model generation process. This optimises the DL models to run on the available GPU hardware. Irrespective of which tracker is selected, the DL People tracker model, DL Object Tracker model and the DL Filter model will all be optimised in one go. This process can take up to 10 minutes per model and may increase with different GPU configurations. The process will not need to be run again unless the GPU hardware is changed. Whilst optimisation is performed a message will be displayed in the live view, and no objects will be tracked during this time.
- Apply: Apply changes to the selected camera.
After the VCAnx server has been installed, the Nx Witness server needs to be configured.
- Open the VCAnx configuration tool and connect to the server.
- Click on the menu icon in the top left.
- Click VCAnx Server List.
- Click Add.
- Enter the IP address VCAnx server is installed on.
- Leave the port set to 3030
- Click OK to return to the previous menu.
- Click Apply to save your changes.
- Click Close to close and return to the previous menu.
Note: You can define up to 4 VCAnx servers.
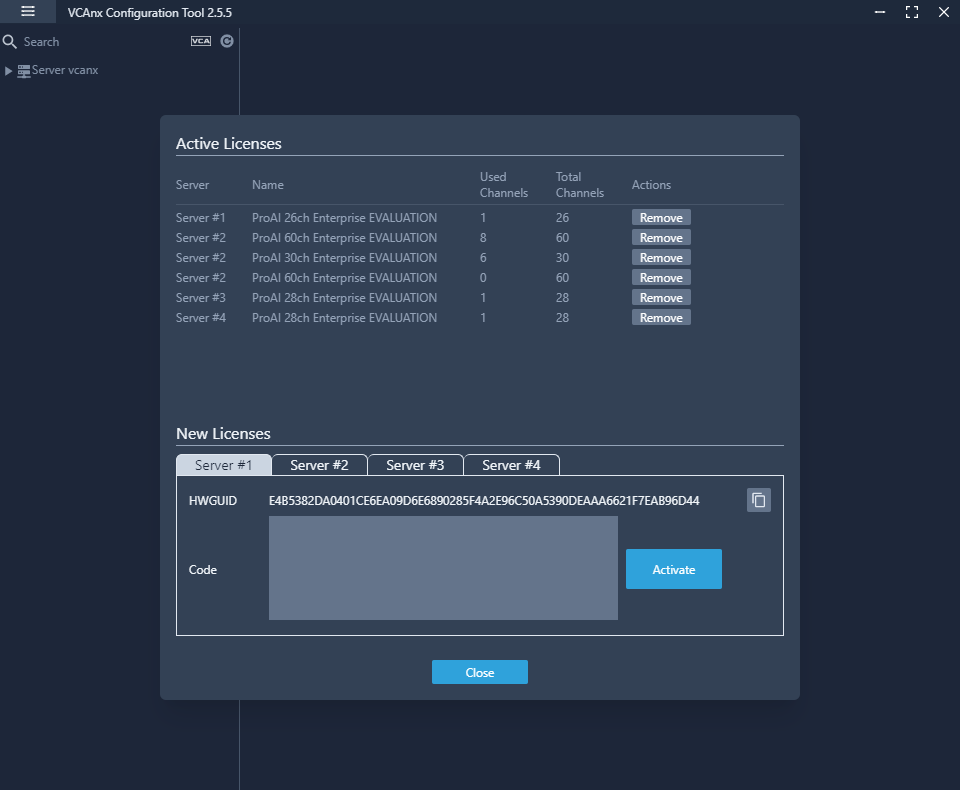
Licenses
In order to use the analytic features, a license is required. Licenses can be managed through the configuration tool. Please refer to your software distributor to obtain licenses
To view and edit the licenses, select License from the menu.
The page provides a list of all the licenses that are available from the configured servers, it also displays which licenses are currently allocated.
Active Licenses
- Remove: Removes the selected license from the server.
New Licenses
Tabs are created for each server, select the server tab to view the HWGUID and new new licenses.
- HWGUID: This is the unique code for the system. Use the HWGUID to obtain an activation code.
- CODE: Type or paste the activation code into the space provided and select Activate.
- Activate: Validates the code and applies the license to the server.
- Copy to clipboard: Copies the HWGUID to the clipboard.
- Close: Closes the license page and returns to the previous screen.
How to add a license(s)
- Click on the server tab to view the HWGUID.
- Obtain an activation code.
- Enter the activation code into the CODE section.
- Click Activate to validate the code and apply it to the server.
How to Remove License(s)
- Click Remove next to the license you would like to remove.
Enabling the plug-in for the camera
After the Nx Witness server has been configured to use the VCAnx servers, enable the plug-in for each of the cameras where you want to apply video analytics.
- Open the VCAnx configuration tool and connect to the server.
- Click on the VCA filter bottom to show all cameras.
- Select the camera and toggle the switch to enable the plug-in for the camera.
Deep Learning
Contains the object classifications and threshold for the deep learning filter.
- Person: Toggle to enable/disable the person object from causing a trigger event.
- Confidence: Define the confidence threshold for the object person. This is the value, as a percentage, after which the object classification will be locked in by the deep learning filter.
- Vehicle: Toggle to enable/disable the vehicle object from causing a trigger event.
- Confidence: Define the confidence threshold for the object vehicle. This is the value, as a percentage, after which the object classification will be locked in by the deep learning filter.
- Apply: Apply changes to the selected camera.
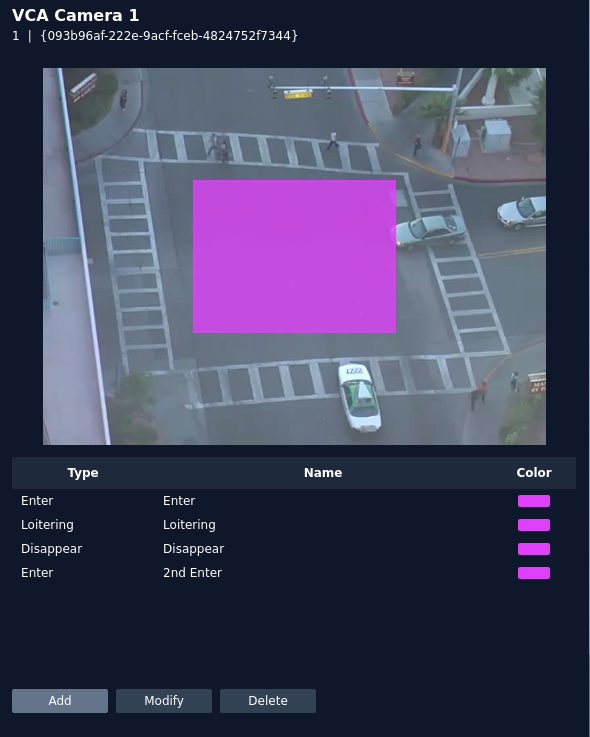
Rules
This displays all the rules that have been configured for the selected camera and allows rules to be created/modified or deleted as required. A snapshot of the camera is displayed on the screen to allow rules to be defined.
- Add: Click to add a new rule.
- Modify: Click to modify the highlighted rule.
- Delete: Click to delete the highlighted rule.
Types of Rules Available
- Intrusion: The intrusion rule triggers an event when an object is first detected in a particular zone.
- Enter: The enter rule triggers an event when an object crosses from outside a zone to inside a zone.
- Exit: The exit rule triggers an event when an object crosses from inside a zone to outside a zone.
- Loitering: The loitering rule triggers an event when an object is present in a particular zone for a pre-defined period of time.
- Appear: The appear rule triggers an event when an object starts to be tracked from within a zone.
- Disappear: The disappear rule triggers an event when an object stops being tracked from within a zone.
- Abandoned: The abandoned rule triggers an event when an object is left in a zone for the specified time.
- Removed: The removed rule triggers an event when the area within a zone has changed for the specified time.
- Stopped: The stopped rule triggers an event when an object has stopped in a particular zone for a pre-defined period of time.
- Line Crossing: The line crossing rule triggers an event when an object is first detected crossing the line.
- Counting Line: The counting line triggers an event when movement is detected crossing the detection line in a particular direction, regardless of the angle of the crossing.
- Tailgating: The tailgating rule triggers an event when objects cross over a line within quick succession of each other, within the defined period of time.
- Direction Violation: The direction violation rule triggers an event when an object crosses the detection line in a particular direction and within the acceptance parameters.
- Logical Rule: Logical rules allows rules to be combined to form a complex filter for events to be checked against to help reduce false alerts.
- None Detection: None detection zones can be used to exclude areas of the scene from being analysed. This can be used to reduce false triggers that can be caused by moving foliage or busy scenes.
How to Add a Rule
- Select Add to display the available rules.
- Select the rule to be added.
- Configure the rule accordingly.
- Select Apply to save the rule and return to the previous menu.
How to Modify a Rule
- Highlight the rule to be modified.
- Select Modify to open the settings for the rule.
- Modify the rule accordingly.
- Select Apply to save the rule and return to the previous menu.
How to Delete a Rule
- Highlight the rule to be deleted
- Select Delete to delete the rule from the list.
Intrusion
The intrusion rule triggers an event when an object is first detected in a zone.
Note: The intrusion rule will trigger in the same circumstances as the Enter and Appear rule, the choice of which rule is most appropriate will depend on the scenario.
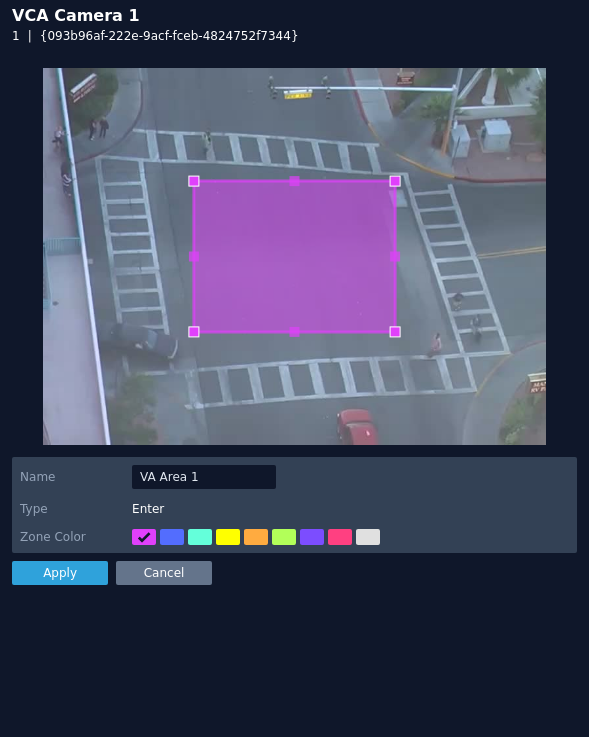
The rule will create a zone and overlay it on the snapshot image, the zone can be reshaped accordingly. Selecting a minor node will split the segment and create a more complex shape, to remove a segment, right-click a major node and select delete.
- Name: Define a name for the rule.
- Object Filter: Defines if the objects will be filtered before triggering an event.
- Zone colour: Define a colour for the zone.
- Apply: Apply to save the rule and return to the previous menu.
- Cancel: Cancel changes and return to the previous menu.
Note: The object filter option is only available when the standard object tracker and Deep Learning Object tracker are selected. Filter options will change depending on which tracker is being used.
Enter
The enter rule triggers an event when an object crosses from outside a zone to inside a zone.
Note: The enter rule detects already-tracked objects crossing the zone border from outside to inside.
The rule will create a zone and overlay it on the snapshot image, the zone can be reshaped accordingly. Selecting a minor node will split the segment and create a more complex shape, to remove a segment, right-click a major node and select delete.
- Name: Define a name for the rule.
- Object Filter: Defines if the objects will be filtered before triggering an event.
- Zone colour: Define a colour for the zone.
- Apply: Apply to save the rule and return to the previous menu.
- Cancel: Cancel changes and return to the previous menu.
Note: The object filter option is only available when the standard object tracker and Deep Learning Object tracker are selected. Filter options will change depending on which tracker is being used.
Exit
The exit rule triggers an event when an object crosses from inside a zone to outside a zone.
Note: The exit rule detects already-tracked objects crossing the zone border from inside to outside.
The rule will create a zone and overlay it on the snapshot image, the zone can be reshaped accordingly. Selecting a minor node will split the segment and create a more complex shape, to remove a segment, right-click a major node and select delete.
- Name: Define a name for the rule.
- Object Filter: Defines if the objects will be filtered before triggering an event.
- Zone colour: Define a colour for the zone.
- Apply: Apply to save the rule and return to the previous menu.
- Cancel: Cancel changes and return to the previous menu.
Note: The object filter option is only available when the standard object tracker and Deep Learning Object tracker are selected. Filter options will change depending on which tracker is being used.
Loitering
The loitering rule triggers an event when an object is present in a particular zone for a predefined period of time.
The rule will create a zone and overlay it on the snapshot image, the zone can be reshaped accordingly. Selecting a minor node will split the segment and create a more complex shape, to remove a segment, right-click a major node and select delete.
- Name: Define a name for the rule.
- Threshold: Define, in seconds, the period of time an object needs to be present in a zone to trigger an event.
- Object Filter: Defines if the objects will be filtered before triggering an event.
- Zone colour: Define a colour for the zone.
- Apply: Apply to save the rule and return to the previous menu.
- Cancel: Cancel changes and return to the previous menu.
Note: The object filter option is only available when the standard object tracker and Deep Learning Object tracker are selected. Filter options will change depending on which tracker is being used.
Appear
The appear rule triggers an event when an object starts to be tracked from within a zone.
The rule will create a zone and overlay it on the snapshot image, the zone can be reshaped accordingly. Selecting a minor node will split the segment and create a more complex shape, to remove a segment, right-click a major node and select delete.
- Name: Define a name for the rule.
- Object Filter: Defines if the objects will be filtered before triggering an event.
- Zone colour: Define a colour for the zone.
- Apply: Apply to save the rule and return to the previous menu.
- Cancel: Cancel changes and return to the previous menu.
Note: The object filter option is only available when the standard object tracker and Deep Learning Object tracker are selected. Filter options will change depending on which tracker is being used.
Disappear
The disappear rule triggers an event when an object stops being tracked within a zone.
The rule will create a zone and overlay it on the snapshot image, the zone can be reshaped accordingly. Selecting a minor node will split the segment and create a more complex shape, to remove a segment, right-click a major node and select delete.
- Name: Define a name for the rule.
- Object Filter: Defines if the objects will be filtered before triggering an event.
- Zone colour: Define a colour for the zone.
- Apply: Apply to save the rule and return to the previous menu.
- Cancel: Cancel changes and return to the previous menu.
Note: The object filter option is only available when the standard object tracker and Deep Learning Object tracker are selected. Filter options will change depending on which tracker is being used.
Abandoned
The abandoned rule triggers an event when an object is left in a zone for the specified time.
Note: The abandoned object threshold time is a global setting and can be found in the advanced section.
The rule will create a zone and overlay it on the snapshot image, the zone can be reshaped accordingly. Selecting a minor node will split the segment and create a more complex shape, to remove a segment, right-click a major node and select delete.
- Name: Define a name for the rule.
- Zone colour: Define a colour for the zone.
- Apply: Apply to save the rule and return to the previous menu.
- Cancel: Cancel changes and return to the previous menu.
Removed
The removed rule triggers an event when the area within a zone has changed for the specified time.
Note: The removed object uses the same threshold as the abandoned rule, the abandoned threshold time is a global setting and can be found in the advanced section.
The rule will create a zone and overlay it on the snapshot image, the zone can be reshaped accordingly. Selecting a minor node will split the segment and create a more complex shape, to remove a segment, right-click a major node and select delete.
- Name: Define a name for the rule.
- Zone colour: Define a colour for the zone.
- Apply: Apply to save the rule and return to the previous menu.
- Cancel: Cancel changes and return to the previous menu.
Stopped
The stopped rule triggers an event when an object has stopped in a particular zone for a pre-defined period of time.
Note: The stopped rule does not detect abandoned objects. It only detects objects which have moved at some point and then become stationary.
The rule will create a zone and overlay it on the snapshot image, the zone can be reshaped accordingly. Selecting a minor node will split the segment and create a more complex shape, to remove a segment, right-click a major node and select delete.
- Name: Define a name for the rule.
- Threshold: Define, in seconds, the period of time an object needs to be stationary in a zone to trigger an event.
- Object Filter: Defines if the objects will be filtered before triggering an event.
- Zone colour: Define a colour for the zone.
- Apply: Apply to save the rule and return to the previous menu.
- Cancel: Cancel changes and return to the previous menu.
Note: The object filter option is only available when the standard object tracker and Deep Learning Object tracker are selected. Filter options will change depending on which tracker is being used.
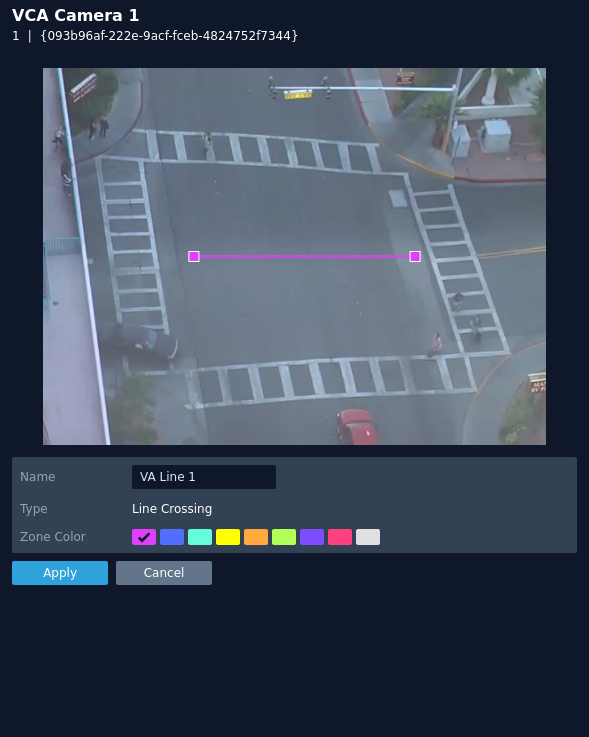
Line Crossing
The line crossing rule triggers an event when an object is first detected crossing a particular line.
Note: line crossing rule will trigger in the same circumstances as the direction violation rule, the choice of which rule is most appropriate will depend on the scenario.
The rule will create a line and overlay it on the snapshot image.
- Name: Define a name for the rule.
- Object Filter: Defines if the objects will be filtered before triggering an event.
- Zone colour: Define a colour for the zone.
- Apply: Apply to save the rule and return to the previous menu.
- Cancel: Cancel changes and return to the previous menu.
Note: The object filter option is only available when the standard object tracker and Deep Learning Object tracker are selected. Filter options will change depending on which tracker is being used.
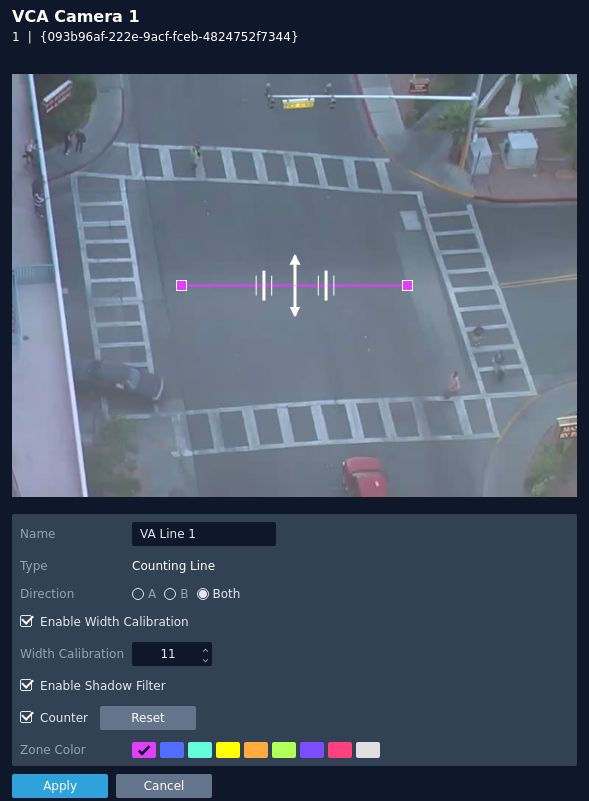
Counting Line
The counting line rule triggers an event when movement is detected crosses the line in the direction indicated and within the width defined.
Note: The counting line defers from the direction rule in that it does not use the VA object tracker, instead it detect motion past the line.
The rule will create a line and overlay it on the snapshot image.
- Name: Define the name of the rule.
- Direction: Define the direction that will be monitored for movement and for triggering events.
- A: Only direction A will be monitored across the counting line.
- B: Only direction B will be monitored across the counting line.
- Both: Both directions across the counting line will be monitored.
Note: The direction that will be used is shown on the screen as you select the options.
- Enable Width Calibration: Turn the width calibration feature on or off.
- Width Calibration: Define the width calibration value, used to adjust the minimum and maximum width of objects crossing the line that will trigger an event.
- Enable Shadow Filter: Turn the shadow filter on or off, this attempts to compensate for shadows cast by objects.
- Counter: Toggle to enable or disable a counter for this line.
- Reset: Click to reset the counter.
- Zone colour: Define a colour for the zone.
- Apply: Apply to save the rule and return to the previous menu.
- Cancel: Cancel changes and return to the previous menu.
Note: The object filter feature is not available when using the counting line rule.
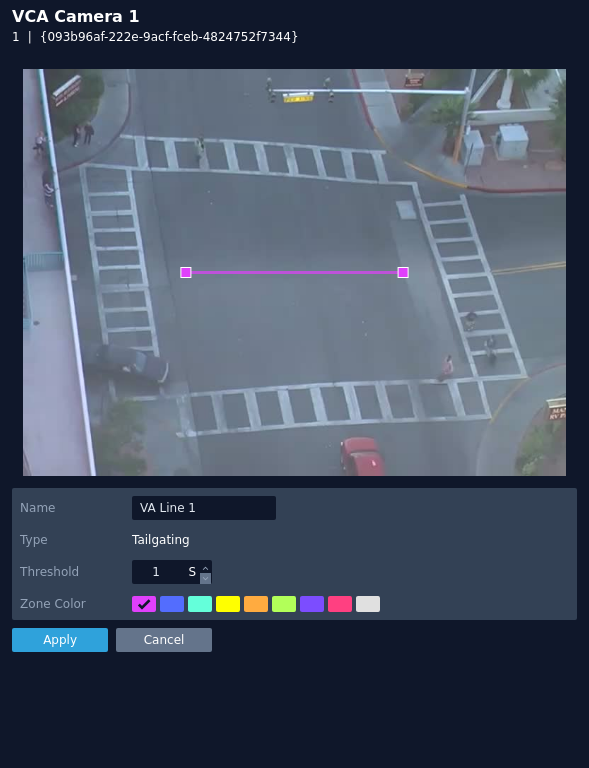
Tailgating
The tailgating rule triggers an event when objects cross over a line within quick succession of each other, within the defined time.
The rule will create a line and overlay it on the snapshot image.
- Name: Define a name for the rule.
- Threshold: Define, in seconds, the maximum amount of time between each object crossing the line before triggering an event.
- Zone colour: Define a colour for the zone.
- Apply: Apply to save the rule and return to the previous menu.
- Cancel: Cancel changes and return to the previous menu.
Direction Violation
The direction violation rule triggers an event when an object crosses the detection line in a particular direction and within the acceptance parameters.
The rule will create a line and overlay it on the snapshot image.
- Name: Define the name of the rule.
- Angle: Define the direction the objects move in order to trigger an event.
- Acceptance: Define the allowed variance each side of the angle that will still trigger an event.
- Object Filter: Defines if the objects will be filtered before triggering an event.
- Zone colour: Define a colour for the zone.
- Apply: Apply to save the rule and return to the previous menu.
- Cancel: Cancel changes and return to the previous menu.
Note: You can also adjust these settings using the on-screen controls. Click and hold inside the dotted circles and drag to your desired angle.
Note: The object filter option is only available when the standard object tracker and Deep Learning Object tracker are selected. Filter options will change depending on which tracker is being used.
Logical Rule
Logical rules extend the standard rules to allow various inputs to be combined using logical expressions, this helps to reduce false events.
Note: Only certain rules can be used in a logical rule.
- Name: Define the name of the rule.
- Select Rule: Define the first rule that will be used in the logical rule.
- Then within: Define the period of time between within which the two rules can occur.
- Select Rule: Define the second rule that will be used in the logical rule.
- Add a clause: Add an additional rule to the logical rule, this displays a new Then within field for the rule.
- Apply: Apply to save the rule and return to the previous menu.
- Cancel: Cancel changes and return to the previous menu.
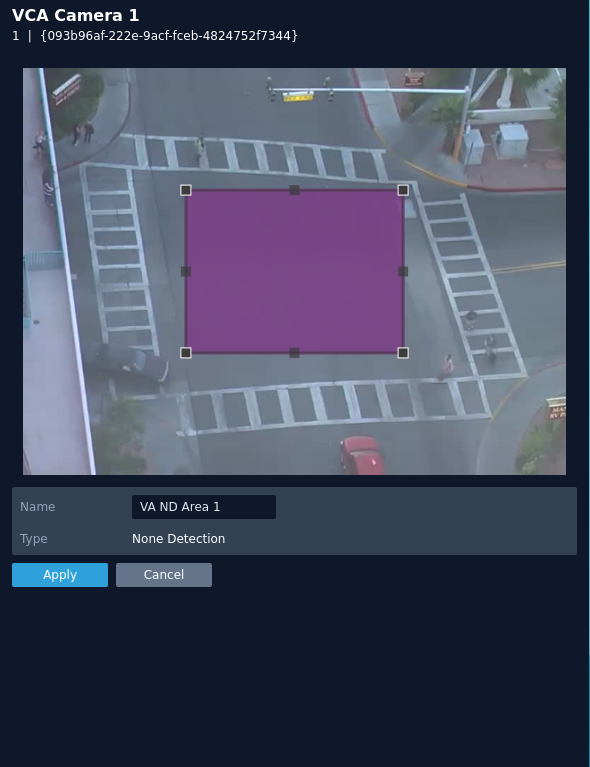
None Detection
The none detect zone can be used to exclude areas of the scene from being analysed. This can be used to reduce false triggers that can be caused by moving foliage or busy scenes.
The rule will create a zone and overlay it on the snapshot image, the zone can be reshaped accordingly. Selecting a minor node will split the segment and create a more complex shape, to remove a segment, right-click a major node and select delete.
- Name: Define the name of the none detect zone.
- Apply: Apply to save the rule and return to the previous menu.
- Cancel: Cancel changes and return to the previous menu.
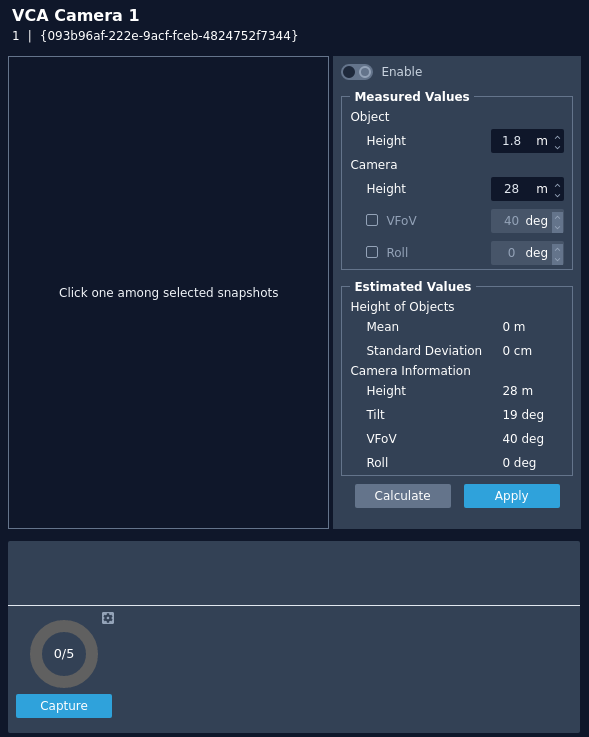
Calibration
Camera calibration is required in order for object identification and classification to occur. If the height, tilt and vertical field-of-view are known then these can be entered as parameters in the appropriate fields. If however, these parameters are not known then you can use the auto-calibration tool to suggest suitable values.
- Enable: Toggle to enable/disable the calibration feature.
Measured Values
- Object Height: Defines the typical height of the objects being used as guide points on the image.
- Camera Height: Defines the height of the camera.
- VFOV: Defines the vertical field of view of the camera.
- Roll: Defines the tilt of the camera.
Estimated Values
This section is populated by the calibration tool based on the snapshots and guide points you define in the 5 or more snapshots.
- Calculate: Activates the calibration tool and estimates the height, tilt, VFoV and roll based on the guide points defined in the snapshots.
- Apply: Saves any changes that have been made.
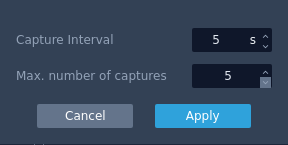
- Capture: Instructs the plug-in to capture a set number of images from the camera over the given interval period, as defined in the settings cog.
How to Calibrate a Camera
- Click the cog icon at the bottom.
- Define the number of images and interval period for the image capture.
- Click capture to start capturing images.
- Select a minimum of 5 images to use in the calibration tool, click on the images to move them into a holding section. Images can be removed by clicking the X in the top right.
- Click on one of the selected images in the holding section to display it on the main view.
- Click on the image in the main view to create a guide point. Create a line to show the location of an object that matches the object height.
- Repeat this for each image in the holding section, when finished you will have a number of guide points on the main view.
Note: The more images you use, the more accurate the calibration tool will become.
- Click Calculate to begin the estimation process. The plug-in will suggest estimates for the height, tilt, VFoV and roll and update the settings accordingly. You can adjust them as required.
Click Apply to save your changes.
Classification
When the calibration features have been defined, objects that are detected are assessed and assigned to one of the classifiers listed in the classification section. it has been preprogrammed with the most commonly used classifiers but these can adjusted if the scenario requires.
Adjust the settings of the classifiers by either overwriting the current setting or using the up/down arrows to change the setting.
Note: The calibration process must be completed before objects can be classified.
Min. Area: Defines the minimum area for the new classifier.
Max. Area: Defines the maximum area for the new classifier.
Min. Speed: Defines the minimum speed for the new classifier.
Max. Speed: Defines the maximum speed for the new classifier.
Apply: Apply to save the changes and return to the previous menu.
Note: When modifying classifiers, avoid overlapping parameters with other classifiers as this will cause the analytics engine to incorrectly identify objects.
Tamper
The Tamper feature is intended to detect camera tampering events such as bagging, defocusing and moving the camera. This is achieved by detecting large persistent changes in the image.
- Enable Tamper Detection: Toggle to enable/disable the tamper feature for the selected camera.
- Alarm Timeout: Defines the length of time, in seconds, that the image must be persistently changed before the alarm is triggered.
- Alarm Threshold: Defines the percentage area of the image which must be changed for the tampering to be triggered.
- Suppress Alarm on light: Toggle to enable/disable the feature. This feature mitigates scenarios where sudden changes in lighting such as switching on/off indoor lighting can cause false tamper events.
- Apply: Click Apply to save the current settings.
Note: The option will reduce sensitivity to genuine alarms and should be used with caution. Remember to Apply changes for them to take effect
Advanced
The advanced section contains settings relating to how the analytics engine tracks objects.
Note: In most installations the default configuration will apply.
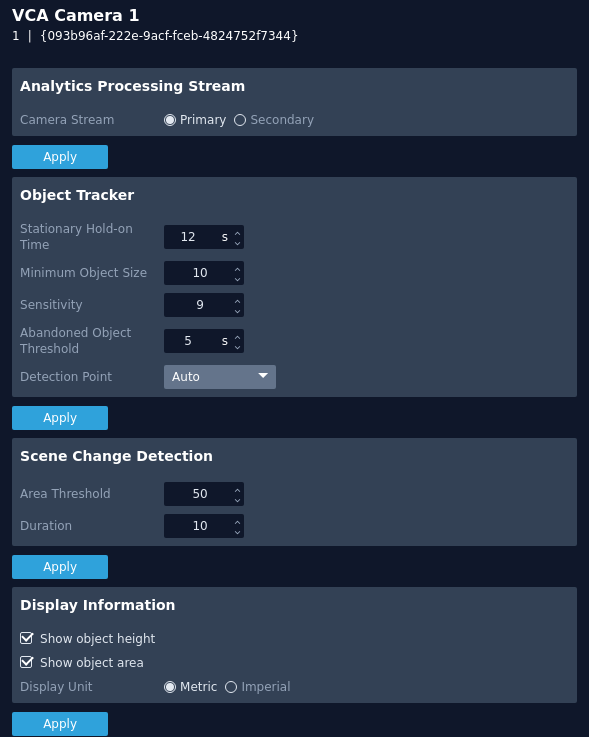
Analytics Processing Stream
- Camera Stream: Defines the stream used for processing analytics.
- Primary: Click to use the Primary stream.
- Secondary: Click to use the Secondary stream.
- Apply: Apply changes to the selected camera. Note: Ensure that these streams are available through Nx Witness.
Object Tracker
- Stationary Hold-on Time: Defines the amount of time an object will continue to be tracked and classified once it becomes stationary.
- Minimum Object Size: Defines the size of the smallest object that will be considered for tracking.
- Sensitivity: Defines the tracker sensitivity, the lower the number, the more sensitive the tracker becomes. Recommended range for common use is 1 to 16.
- Abandoned Object Threshold: Defines the amount of time used by the abandoned and removed rules.
- Detection Point: Defines the tracking point that will be used to evaluate objects against rules.
- Auto: In auto mode the detection point is automatically set based on how the calibration is configured.
- Mid bottom In mid bottom mode the detection point for each object is located along the bottom line of the bounding box, in the centre.
- Centroid In centroid mode the detection point for each object is located at the middle of the bounding box.
- Apply: Apply changes to the selected camera.
Note: Changing the detection point that is used by the system can effect the point at which objects will trigger an event.
Scene Change
- Area Threshold: Defines the percentage area of the scene that must change in order to trigger the scene change process.
- Duration: Defines the period of time the scene needs to have changed before triggering the scene change process.
- Apply: Apply changes to the selected camera.
- Show object height: Toggle to enable/disable the object height from being annotated on the camera image.
- Show object area: Toggle to enable/disable the object area from being annotated on the camera image.
- Display Unit:
- Metric: Click to show all units in metric.
- Imperial: Click to show all units in imperial.
- Apply: Apply changes to the selected camera.